Crafting and Loot in Dead Zone Revive
Navigate rarity, recipes, and the massive item pool without drowning in junk.
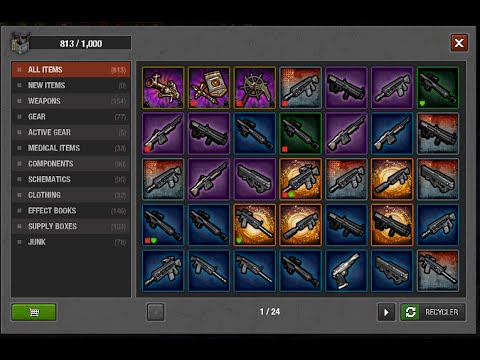
Dead Zone Revive advertises more than 30,000 craftable and lootable items with rarity tiers — a hallmark of the classic Dead Zone loot chase, rebuilt by Ruby Realms Studios and Switch Compagnie as a not-for-profit fan revival licensed with Con Artist Games. Crafting turns mission mats into gear; loot fills gaps recipes cannot cover. Together they fuel Scavenging Missions, Compound Setup, and alliance trade in Alliances and Raiding.
New players: skim Getting Started, then return here after your first extraction. Pair with Controls for inventory hotkeys.
Loot versus craft: when to do which
| Source | Best for | Risk |
|---|---|---|
| Mission loot | Random upgrades, blueprints, event drops | Death before extract |
| Crafting | Targeted slots, compound modules | Mat grind, bench tier gates |
| Trading / alliance | Duplicate swaps | Social overhead |
Neither path is pay-to-win — the project sells no power shortcuts. Progress is time and knowledge.
Early Access may adjust drop tables without fanfare. When a farm route dies, check Updates before blaming RNG.
Rarity tiers (conceptual framework)
Exact color names can differ by UI skin, but the ladder repeats:
- Common / gray — vendor trash, starter filler.
- Uncommon / green — early mission staples.
- Rare / blue — build-defining mods appear.
- Epic / purple — long-term bis pieces for specialized roles.
- Legendary / gold — chase items, often build-around.
Use the Items database for precise stat names. Use Tier List for which classes benefit most from each slot meta.
Blueprints and recipe unlocks
Some crafts require blueprints found in missions, alliance rewards, or compound research stations. Blueprint rules:
- Consumed on learn or permanent account unlock — verify tooltip each patch.
- Often zone-gated — see Map for rumored drop locations.
- Engineer survivors may reduce craft costs once learned — Class Overview.
Track missing mats on the Resource Checklist so blueprint hunts have a finish line.
Crafting station tiers
Compound benches gate item level:
- Tier 1 — tutorial weapons, basic walls.
- Tier 2 — mid-zone mission parity.
- Tier 3+ — endgame mods and advanced defense.
Upgrade stations via Compound Setup before hoarding mats you cannot use. Engineer assignment near benches saves real time across thousands of crafts.
Inventory filtering workflow
After every mission, run this five-step sort:
- Equip immediate upgrades — compare tooltips (Alt in Controls).
- Stash blueprint and mod candidates — one crate dedicated.
- Sell or recycle gray/green unless Beginner Tips says keep for a daily quest.
- Deposit bulk mats — link to checklist goals.
- Stage next loadout — Loadout Planner output to hotbar.
Bag space is a soft timer in Scavenging Missions. Extract early if you only carry junk.
Mods, slots, and build identity
High-tier items often carry mod slots — grip, barrel, plate, utility. A purple weapon with wrong mods loses to a blue weapon tuned for your class.
Build identity questions:
- Does this item serve Fighter burst or Medic sustain?
- Does armor trade mobility for raid defense?
- Does the mod help PvE farming or player raiding?
Document answers in the Loadout Planner so alliance mates do not borrow pieces mid-build.
Recycling and economy sinks
Dead Zone Revive needs sinks for 30k items or inflation explodes:
- Vendor sale — quick cash, low value.
- Salvage / recycle — returns partial mats for crafting loops.
- Crafting fuel — some benches consume lower tiers as inputs.
Do not recycle unknown blues during Early Access — patch notes sometimes buff overlooked mods.
Class-specific loot priorities
| Class | Loot focus | Craft focus |
|---|---|---|
| Leader | Alliance buff gear, utility mods | Squad consumables |
| Fighter | Weapons, armor plates | Ammo-efficient guns |
| Scavenger | Container speed tools, carry weight | Sell-value optimize kits |
| Engineer | Trap parts, deployables | Base defense modules |
| Medic | Healing efficiency, revive kits | Med consumable stacks |
| Recon | Stealth, intel scanners | Mission speed tools |
Cross-read How to Play for loop context and Players for roster planning.
Farming routes without burnout
Pick one slot per week — helmet, primary, base wall tier — and run missions that target it. Random loot feels infinite; goal loot feels rewarding.
Share routes with alliance mates (Alliances and Raiding) but avoid publicizing exploit spawns — developers patch them, and the fan project depends on fair play.
External context
For impressions of how generous loot feels versus classic Dead Zone, see Links and Review. Community sentiment helps calibrate expectations during Early Access when drop rates shift weekly.
Crafting and loot are the spreadsheet soul of Dead Zone Revive disguised as action RPG adrenaline. Respect the item ocean — sail with a compass, not driftwood hope.
Frequently Asked Questions
Quick answers for survivors in the Dead Zone.
How many items are in Dead Zone Revive?
Official messaging cites 30,000-plus craftable and lootable items with rarity tiers. The Items database wiki page indexes searchable subsets as data is curated.
Should I sell or keep green items?
Keep greens only until you have blues in that slot or a craft ready. Early game gold matters; mid game stash clarity matters more.
Where do blueprints drop?
Mostly scavenging missions and events. Zone specifics shift in Early Access — use Map guides and Updates when farming one blueprint.
Does crafting require real money?
No pay-to-win monetization is claimed. Crafts consume in-game mats from missions and recycling, not cash shop shortcuts.
Which tool helps track crafting mats?
Use the Resource Checklist wiki tool alongside Compound Setup so you know which mission loot feeds your next bench upgrade.